Animation is often treated as a visual add-on, but in reality, it’s one of the most deliberate tools in content communication. Each animation style speaks a different visual language and serves a different cognitive function. So, how do you decide what to use and when to use it?
This blog unpacks the concept behind the animation content map, helping creative teams, educators, businesses, and marketing professionals select the most effective animation style based on their specific goals. While the infographic (attached below) summarizes the core framework visually, this blog digs deeper — explaining the logic, psychology, and use-cases behind those choices.
Why a Strategic Approach to Animation Matters
Animation isn’t one-size-fits-all. Using the wrong format for the wrong goal leads to unclear messaging, cognitive overload, or missed emotional cues. For example, using motion graphics for a character-led emotional narrative weakens the intended connection. Similarly, a character animation format applied to an app tutorial may feel unnecessarily dramatic or lengthy.
This is especially relevant for businesses working with a video and animation agency or an eLearning company in India. Understanding this distinction not only improves content effectiveness but also saves on production cycles and revisions.
The 5 Core Types of Animation Content
Let’s start by outlining the five primary types of animation content widely used today — across industries like corporate learning, marketing, medical training, product design, and explainer storytelling.
1. Motion Graphics
Best suited for: Explainer videos, app interfaces, service breakdowns, policy walkthroughs
Visual Traits: Clean transitions, iconography, abstract graphics, infographics in motion
Core Strength: Simplifies abstract or technical content in a linear, visually satisfying way
Motion graphics is commonly used by eLearning companies in India and tech-based startups to make dry or complex information easy to follow. Whether you’re introducing a new feature or explaining policy workflows, this format gets to the point, fast and clean.
2. Character Animation
Best suited for: Customer journeys, brand storytelling, behavior-based training
Visual Traits: Human-like characters, facial expressions, emotional arcs
Core Strength: Builds connection, empathy, and relatability
When businesses make animated videos that aim to emotionally engage the viewer — such as inclusion training, storytelling campaigns, or service journeys — character animation helps personify the message and connect more deeply with the audience.
3. Whiteboard Animation
Best suited for: Step-by-step instructions, training modules, policy education
Visual Traits: Simulated hand-drawing on a white background, voiceover-driven
Core Strength: Mimics a traditional classroom-style learning experience
Used extensively in e-Learning animated videos, whiteboard animation keeps learners focused and removes distractions. Its simplicity makes it ideal for onboarding videos, compliance training, and internal communication formats that require clarity and sequential logic.
4. 2.5D Animation
Best suited for: Corporate explainers, brand overviews, mid-level visual storytelling
Visual Traits: Layered scenes, pseudo-3D movement, depth without full modeling
Core Strength: Brings life to 2D without the cost and complexity of full 3D
Agencies that specialize in video and animation often use 2.5D for clients who want dynamic visuals with a premium feel but are working within modest timelines or budgets. It’s commonly used in product demos, testimonial-led explainers, or software overviews.
5. 3D Animation
Best suited for: Product modeling, medical visuals, architecture walkthroughs
Visual Traits: Realistic depth, angles, textures, lighting effects
Core Strength: Accurately visualizes objects, processes, and spatial relationships
If you’re an eLearning company in India focused on sectors like healthcare, engineering, or design, 3D animation is often non-negotiable. It allows users to understand scale, functionality, and internal components in a way 2D formats simply cannot replicate.
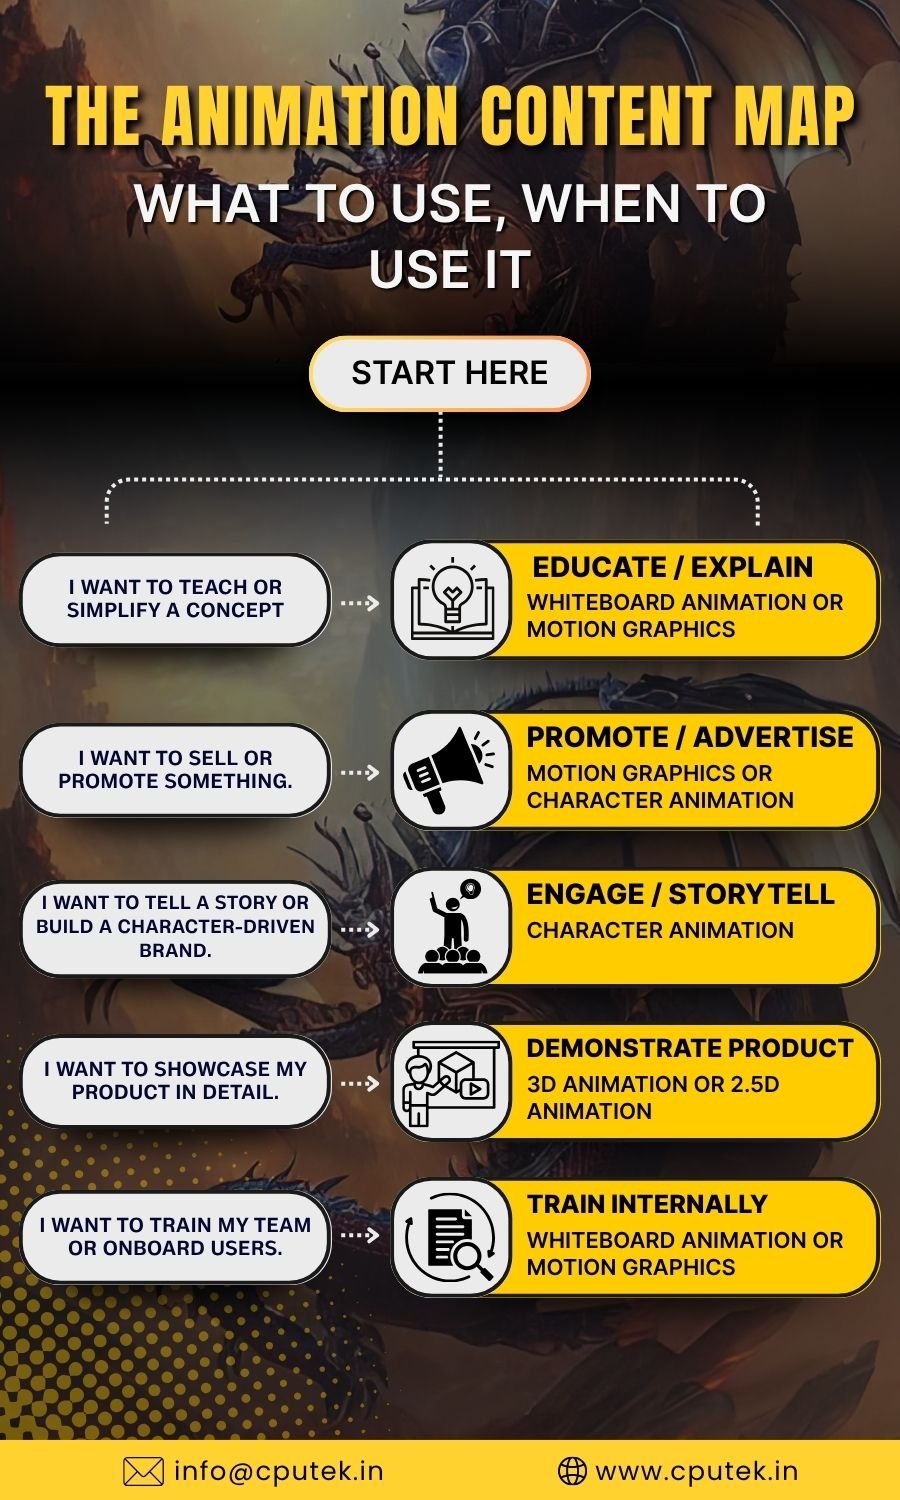
Purpose First: The Decision Tree Behind “When to Use It”
Animation content should always follow the purpose. Below is a simplified decision tree that helps answer the question: “When to use a specific type of animation?”
Start Here: What do you want your animation to do?
→ Teach or explain something? → Educate / Explain
→ Sell or promote a product/service? → Promote / Advertise
→ Tell a story or build emotion? → Engage / Storytell
→ Show how something works? → Demonstrate Product
→ Train employees or onboard users? → Train Internally
This user-intent-led decision tree is also represented visually in the infographic below — giving your team a reference they can return to during content planning.
Matching Purpose with Animation Type: What to Use
Once the goal is identified, selecting the appropriate animation style becomes more straightforward. Below is a goal-wise summary that matches your intent with the most suitable format.
| Content Goal |
Best Animation Style(s) |
| Educate / Explain |
Whiteboard Animation, Motion Graphics |
| Promote / Advertise |
Motion Graphics, Character Animation |
| Storytelling / Engage |
Character Animation |
| Demonstrate Product |
3D Animation, 2.5D Animation |
| Train Internally |
Motion Graphics, Whiteboard Animation |
Most e-Learning animated videos fall into the Educate / Train category, making Whiteboard and Motion Graphics the most widely used formats in that sector. Meanwhile, product-focused marketing content relies on 2.5D and 3D to deliver precise representation with appeal.
Why Animation Strategy Saves More Than Just Budget
For companies working with a video and animation partner or internal L&D teams trying to scale content, the choice of animation type determines more than just the aesthetic. It defines:
- The tone of communication (professional, playful, emotional, instructive)
- The time to produce and revise
- The platform compatibility (mobile-first, LMS, social media, etc.)
- The engagement style (passive watching vs. active learning)
Choosing the wrong type often leads to a mismatch in tone, wasted effort in rework, and weaker viewer retention.
To simplify all these details into a quick-glance reference, we’ve created an infographic that visually maps each animation type to its ideal use-case.
Conclusion
Animation isn’t just about “making things look good.” It’s about aligning communication objectives with visual tools that actually support them. This blog and the infographic together offer a practical framework that’s relevant whether you’re an eLearning company in India, a digital marketing team, or a startup founder exploring ways to make animated videos with clarity.
Start every animation project by asking:
What is the goal — and what visual format will serve it best?
Once that’s clear, the rest follows with less guesswork and more precision.
By day I create engaging content along with infusing high-volume, low-competition keywords strategically so that it gets loved by you and Google Crawler. Off the clock? I scroll for fresh ideas. (Don’t judge, gotta fuel the creativity!)